Table of Contents
Open Table of Contents
1. Introduction
In July 2024, I received a project request from a client in the advertising industry. They needed a system to manage influencers for their advertising campaigns—a tool to search, update, and add influencer information efficiently. Their previous internal system was no longer maintained, forcing employees to manage everything manually using spreadsheets. Having worked together on several projects before, they reached out to me for help.
This project began as a Server-Based Architecture but was recently migrated to a Serverless Microservice architecture using AWS Lambda as a main compute resource. This series documents the journey from initial implementation to Serverless migration, sharing lessons learned and insights gained along the way.
This first part covers the initial requirements, architectural decisions, and implementation details of the server-based system.
2. Requirements Analysis
Based on client meetings, here are the core requirements:
2.1. Functional Requirements
The system centers on influencer management across two platforms:
- Basic CRUD Operations: Add, update, delete, and search influencers
- Multi-Platform Support: The company manages influencers on two main platforms (Platform A and Platform B), with each influencer potentially having accounts on both platforms
- Platform-Specific Operations: All CRUD operations must be performed on a per-platform basis
- Cross-Platform Reference: When viewing a Platform A account, users should see associated Platform B account names of the same influencer, and vice versa
- Automated Metrics Collection: Both platforms provide metrics (e.g., daily visitor count, follower count) to measure account activity and influence. These metrics should be collected automatically (daily or at regular intervals) and kept up-to-date
- Excel Integration:
- Bulk import influencers via Excel file upload
- Export search results to Excel format
2.2. Non-Functional Requirements
- Cost Optimisation: As an internal tool with limited users and low expected traffic, minimising both development and operational costs was the top priority
- IP-Based Access Control: The system should only be accessible from the company’s office IP address. VPN access was excluded to reduce costs
3. Architecture Design Decisions
3.1. Technology Stack
Based on the requirements and constraints, I made the following technology choices:
Infrastructure: AWS
- Most familiar environment for rapid development
- Cloud-managed services eliminate the need for in-house server management
- Largest cloud provider ensures easy hiring for future maintenance
- 12-month free tier available (new account) perfectly suited for this low-traffic internal tool
Infrastructure as Code: AWS CDK
- Unified language (TypeScript) across infrastructure, frontend, and backend, making it easier for future developers to understand and maintain
Frontend: React + Vite
- No SEO requirements for internal tool, so complex SSR Framework is not mandatory.
- SPA approach enables static file deployment
- React with Vite for fast development
Backend: Nest.js
- TypeScript consistency across the entire stack
- Monolithic Server-based architecture for rapid initial development
- Docker containerisation for deployment on ECS
Database: PostgreSQL on RDS
- Reliable relational database for structured influencer data
- RDS for managed database service
Deployment: AWS S3 + CloudFront + ECS
- S3 + CloudFront for frontend (cost-effective static hosting)
- ECS on EC2 for backend container orchestration
Core Design Principle: Prioritise cost optimisation, even if it means some compromises on availability and security aspects.
3.2. System Architecture
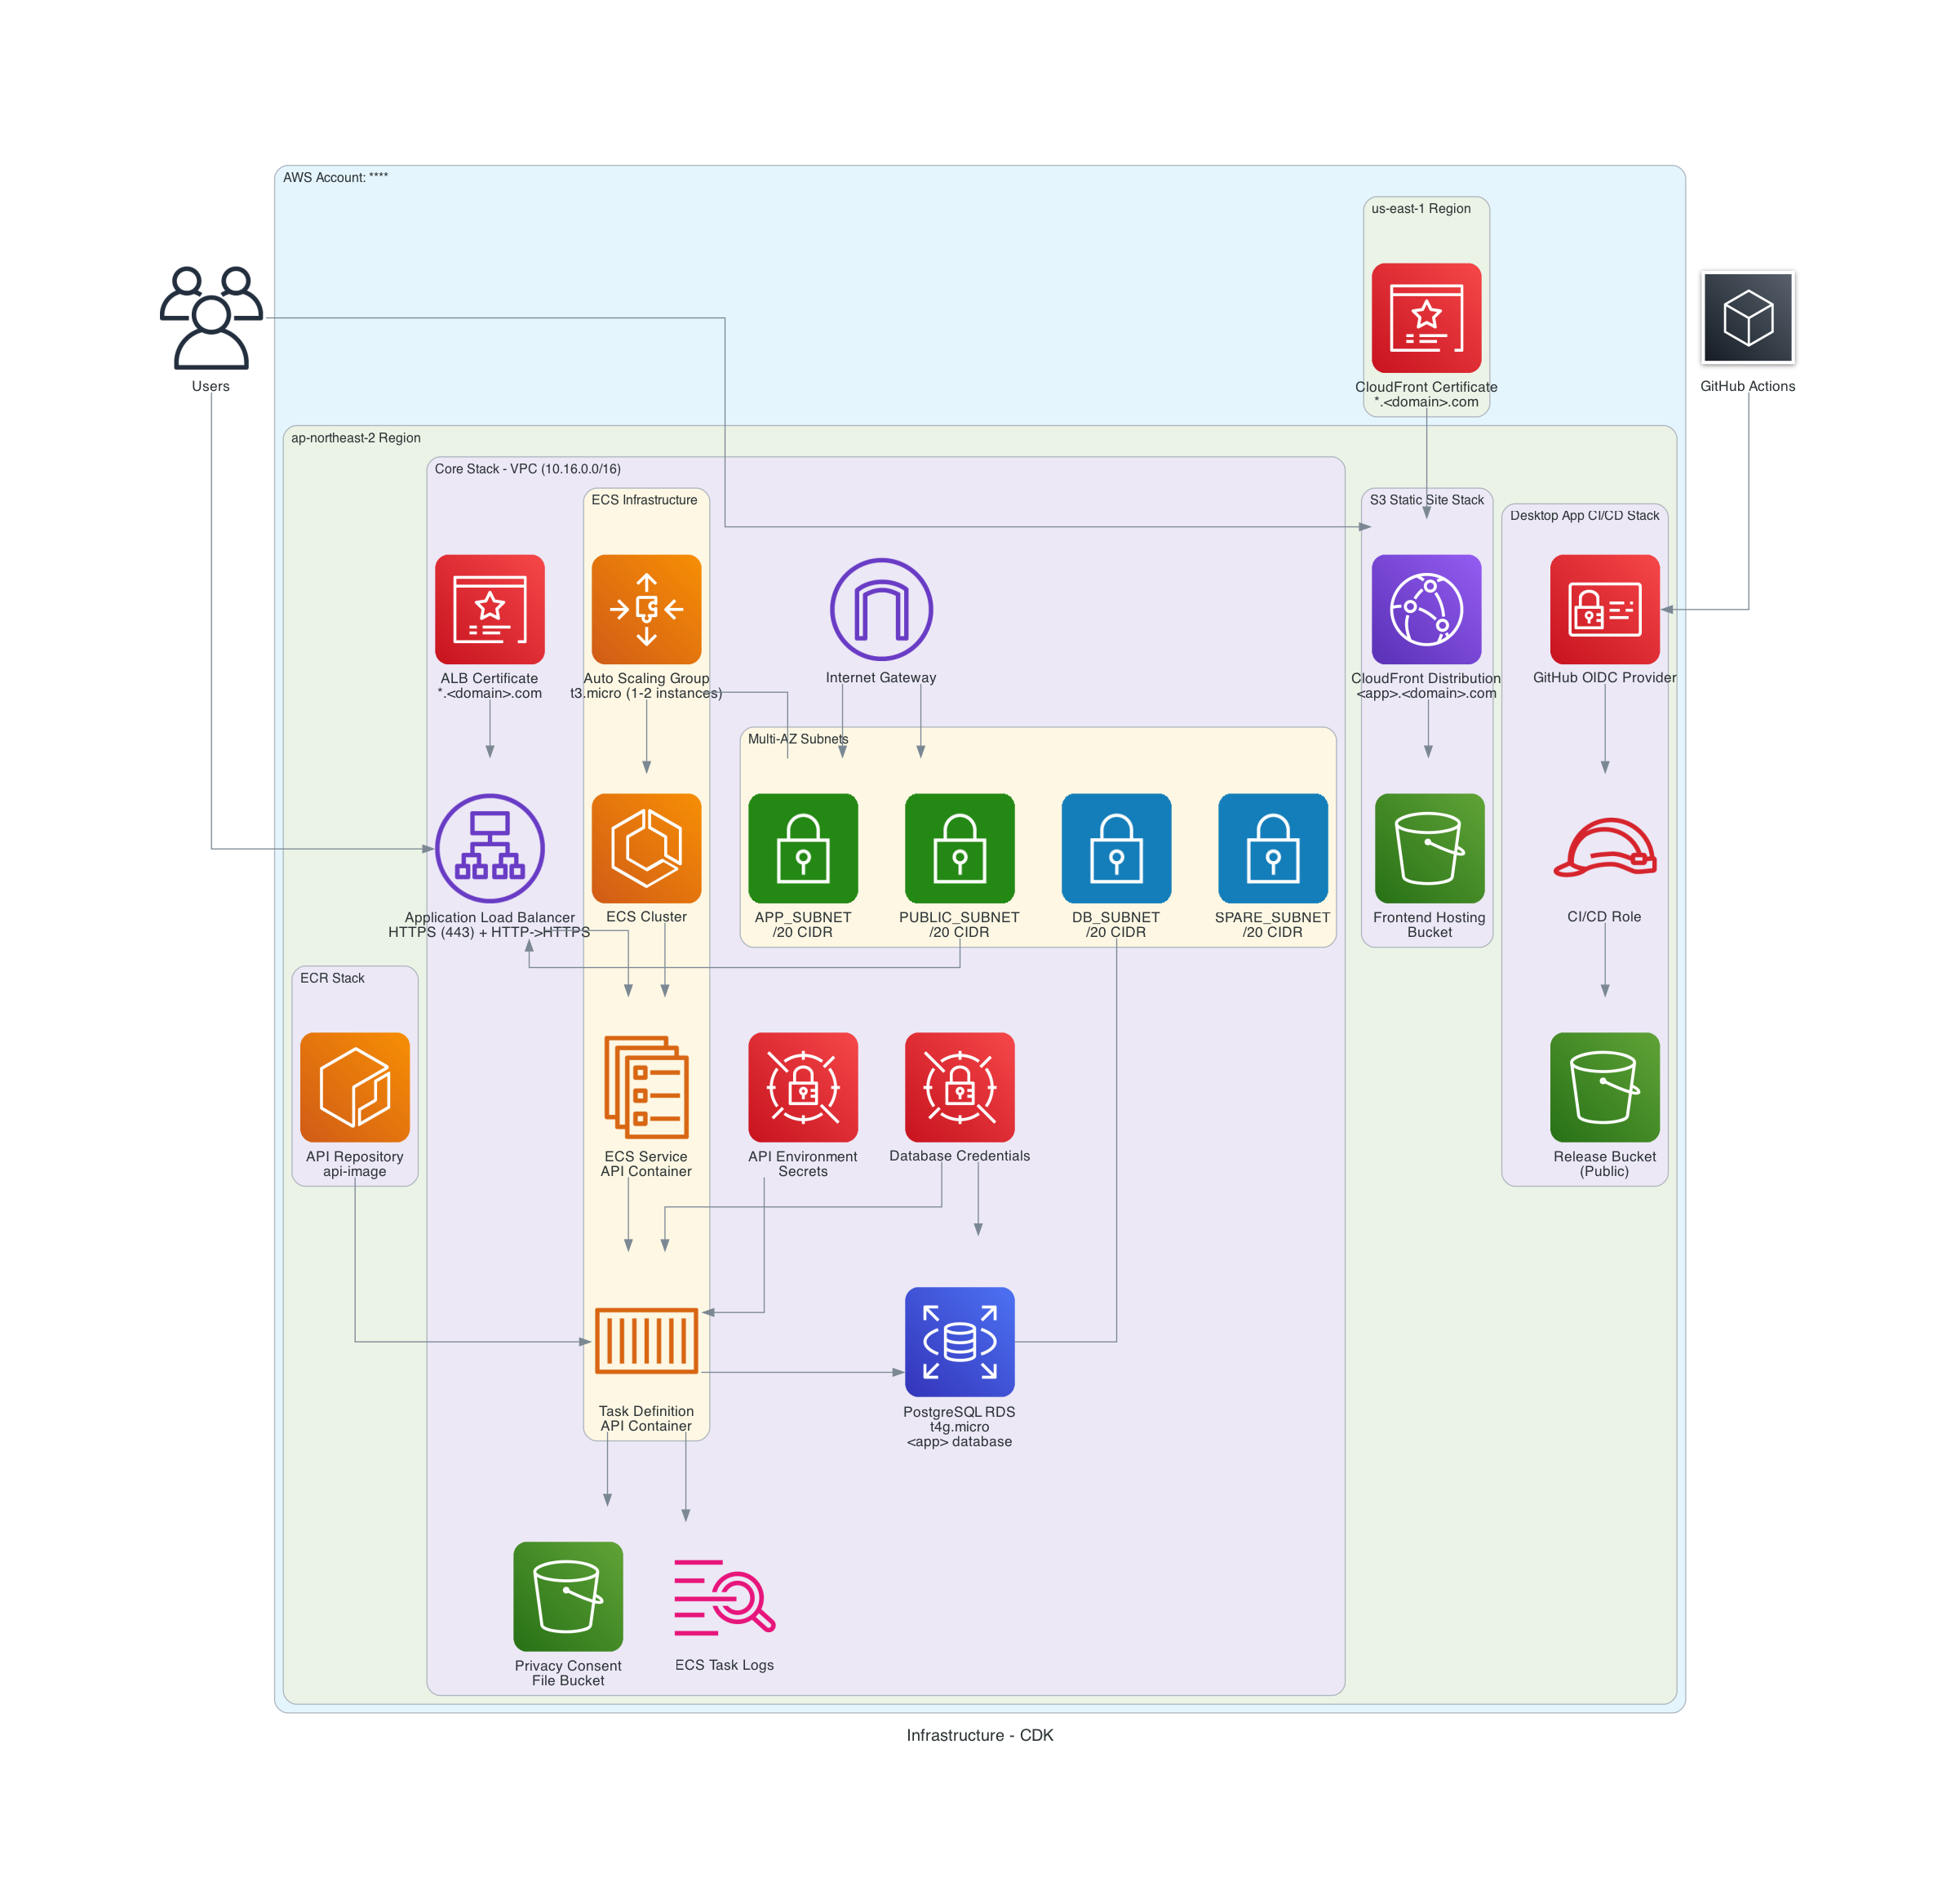
The diagram above shows the final architecture. Below, I’ll explain each component in detail.
3.3. Infrastructure Components
3.3.1. Networking
The custom VPC is divided into four subnets:
App Subnet (Public Subnet)
I initially planned a Private Subnet for backend servers, but the metric collection requirement created a challenge.
The Metric Collection Problem: The Nest.js backend running on ECS includes a cron job that executes daily to collect metrics from external platforms. This cron job is a background task within the same EC2 instance where the main application runs. Since it needs to make outbound requests to external platform APIs, the EC2 instances require internet connectivity.
Why Not Private Subnet with NAT Gateway? A Private Subnet with NAT Gateway would be the most secure approach, but NAT Gateways incur hourly charges. Given the cost-optimisation priority, I decided to use a Public Subnet with an Internet Gateway instead—accepting the trade-off of having public IPs on the backend servers in exchange for lower operational costs.
Implementation:
- EC2 instances receive public IPs for internet access (needed for the daily metric collection cron jobs)
- Security Groups restrict inbound traffic from ALB only (no direct internet access to the instances)
- Additional requirement: Store and retrieve influencer consent forms from S3 (accessible via public internet connection)
Public Subnet
Contains resources that accept incoming requests from the internet:
- Application Load Balancer receives frontend requests from users
- Security Groups restrict inbound traffic to the client’s office IP only (whitelist approach)
DB Subnet (Isolated Subnet)
Completely isolated from external internet:
- RDS instance accessible only from within VPC
- No NAT Gateway or IGW connection
- Security Groups allow inbound traffic only from the server instances in the same VPC
Spare Subnet
Reserved for future scalability but currently unused.
3.3.2. Compute Layer
Backend (ECS on EC2)
To maximise free tier usage:
- Auto Scaling Group launches t3.micro EC2 instances (free tier eligible)
- The ASG serves as Capacity Provider for ECS Service
- Application Load Balancer handles traffic distribution
- The client’s existing domain points to the ALB via CNAME record
Secrets Management
Environment variables managed through AWS Secrets Manager (securely stores sensitive data like API keys and database credentials).
3.3.3. Database Layer
PostgreSQL on RDS (t4g.micro)
- Free tier eligible instance type
- Encryption in transit (SSL) and at rest (KMS)
- 7-day backup retention (cost optimisation trade-off)
Data Modeling
The data model evolved significantly based on real usage:
Initial Design (1:1 Relationships)
To handle cross-platform references, I started with a three-table structure:
Influencertable as the core entityPlatformAandPlatformBtables with 1:1 relationships toInfluencer- Unique constraint on
(name, phone_number)combination to identify individual influencers emailattribute stored inInfluencertable
Evolution to 1:N Relationships
Initially, I designed the data model assuming each influencer had at most one account per platform. However, post-launch feedback revealed a different reality: many influencers managed multiple accounts on the same platform for different niches, brands, or purposes.
This required a data model refactor from 1:1 to 1:N relationships:
- Changed relationships from 1:1 to 1:N (one influencer, many platform accounts)
- Moved
emailfromInfluencerto platform tables because many influencers use different email addresses for different platform accounts (especially when managing accounts for different niches or brands)
3.3.4. Frontend Distribution
S3 + CloudFront
- React SPA build artifacts uploaded to S3 (object storage)
- CloudFront with Origin Access Control (restricts direct S3 access, serves content through CDN for faster delivery)
- The client’s existing domain points to CloudFront via CNAME record
3.3.5. Domain Management and SSL/TLS
Domain Management
To avoid Route53 costs, we used the client’s existing domain hosting service instead of setting up a new Route53 hosted zone. The client’s existing domain points to both ALB (backend) and CloudFront (frontend) via CNAME records.
SSL/TLS
- Obtained free SSL certificate from AWS Certificate Manager for the client’s existing domain
- Integrated the certificate with ALB (for backend HTTPS) and CloudFront (for frontend HTTPS)
3.3.6. CI/CD Pipeline
GitHub Actions
Automated deployment for both frontend and backend.
Security Evolution
I initially used IAM User credentials in GitHub Secrets. Later, I migrated to OIDC (OpenID Connect) with IAM Roles:
- Eliminates long-lived credentials
- Uses temporary credentials via Role assumption
- Follows principle of least privilege
4. Implementation Challenges and Solutions
4.1. Challenge 1: New Feature Requests During Development
Two major features were added:
Platform A Comment Analysis
- Retrieve comment data from Platform A posts
- Export analysis results to Excel including:
- Comment content
- Commenter metrics (e.g., daily visitor count, same as Platform A profiles)
- Relevant URLs identified in comments
Platform A Post Verification
- Upload Excel with Platform A profile URLs and post links
- Download validation results including:
- Platform A metrics (for each profile URL in the uploaded Excel)
- Post validity status (confirms the post is still published and publicly accessible without authentication—not deleted or restricted)
Solution: Implemented as separate modules within the Nest.js application using a modular monolith structure. The existing Platform A metric collection logic was extracted into a shared module that both the Comment Analysis and Post Verification features could reuse, avoiding code duplication and ensuring consistent metric collection across features.
4.2. Challenge 2: Platform B Metrics Collection
Platform B metrics could be collected less frequently, but accessing them from cloud infrastructure was unreliable. The platform’s API uses strict IP-based rate limiting.
The Challenge: The existing EC2-based cron job (running in the App Subnet) was hitting rate limits. I initially hypothesised that Lambda functions, by spinning up new execution contexts, might receive different IP addresses and bypass the rate limiting.
Attempted Solutions
1. Lambda Functions
Hypothesis: Each Lambda invocation with a new context might get assigned a different IP address, allowing us to distribute requests and avoid rate limiting.
Result: Proved unsuccessful. While Lambda does use AWS IP ranges, we discovered that AWS’s IP addresses face much stricter rate limiting than residential IPs. The platform’s API applies aggressive rate limiting to all AWS IP ranges.
2. Proxy Services
Third-party proxy services (which use residential IPs) could provide more generous rate limiting, but they require ongoing subscription costs, contradicting the cost-minimisation priority.
Result: Discarded due to ongoing costs.
Key Discovery: During testing, we found that the office network’s residential IP faced significantly less strict rate limiting compared to AWS IP ranges.
Final Solution: Desktop Application
Since the office network’s residential IP allowed reliable access, I built an Electron desktop app that runs locally:
- Runs on employee computers within the office network (using the office’s residential IP)
- Collects metrics and syncs results via API
- Zero additional cloud infrastructure or service costs
- Employees control when metrics are collected
Trade-offs
Advantages: Zero cost, leverages office network’s stable IP, reliable access
Disadvantages: Manual trigger (not automated), requires employee action
Since Platform B updates less frequently, this trade-off was acceptable.
Deployment: Built with Electron and distributed via S3.
5. Conclusion
This post covered the requirements and server-based architecture for the influencer management system. As a solo project, I prioritised cost optimisation and maximising AWS free tier usage.
6. Next in the Series
Part 2: The Cost Crisis and Path to Change covers the critical moment when AWS Free Tier ended:
- Why monthly costs jumped from $13 to $73
- The unexpected IPv4 address cost discovery
- Three options evaluated: Savings Plans, Single Instance, and Serverless
- Why Serverless became the only viable choice for this usage pattern
- The business case for 85% cost reduction and zero operational overhead
Series Navigation
- Part 1: The Initial Server-Based Architecture (Current)
- Part 2: The Cost Crisis and Path to Change
- Part 3: Technology Choices and Their Rationale